Tips and tricks for making the most of your daypack to help you make steady, well-aimed shots in the field.
I honestly can’t recall the first time I used a pack as a shooting rest. For sure I didn’t when I was kid. I was a fledgling gunwriter well into my twenties before I understood the necessity for taking good field photographs, so I didn’t haul around a full-size SLR camera in a pack. Also, I was doing a lot more horseback hunting back then. Provided you don’t intend to get too far from your horse, saddle bags work just fine, and a pack is a pain in the neck on horseback. Yet another point: In collegiate smallbore shooting and in the Marines I’d concentrated on formal “position” shooting. So in those days I was more likely to use prone if I could, or a tight sitting position if I couldn’t.
At some point, though, carrying a daypack became standard operating procedure. Obviously they’re handy for rain gear, lunch, an extra layer, knife sharpener, fire-starting stuff, first aid kit and more—sometimes a spotting scope and tripod. It’s easy to weigh yourself down, but I’ve avoided carrying two or three spare chain saws and a pontoon bridge. However, it was the need to carry cameras that drove me to the pack. These days perfectly adequate digital cameras have gotten very compact, but for years I carried two full-size SLR film cameras, one for color slides and one for black and white, and of course I carried a lot of 35mm film. (For those who don’t remember, this was celluloid stuff that came in little canisters.)
Somewhere in there the revelation hit me that a pack could be used to provide an almost ideal shooting rest. I don’t claim proprietary knowledge; I must have seen someone do this or perhaps I read about it, but I came to it without any formal instruction. And since I almost always carried a pack using it became my “go to” option for field shooting. I’m older today; I carry less and I carry smaller cameras, but I still almost always carry a daypack, and using it is still my “go to” shooting rest.
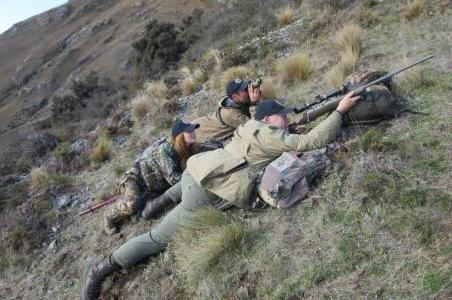
June 2015, shooting a red stag in New Zealand. The slope was so steep that it was essential to hold the fore-end with my supporting hand, and also so steep that, if you look close, I have my left foot on Brittany’s leg to keep from sliding down the hill!
In recent years I’ve actually received formal instruction. As the SAAM shooting schools they will give you great ideas on how to use a pack—or, adding your buddy’s or a guide’s pack—a couple of packs to “build your house” for a steady shooting rest. I’m happy to say that the way I’d been doing it for perhaps thirty years was pretty well in sync with the way the instructors recommended.
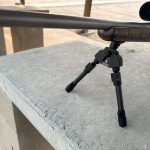
Now, at the SAAM course they also recommend bipods. The bipod is an extremely useful tool, and I do use them sometimes. However, one of my favorite rifles for long-range shooting is the Blaser R8. The forward sling swivel stud is mounted horizontally at the tip of the fore-end, so it not suitable for the most common bipods, like the Harris, that clamp to a vertical sling swivel stud mounted toward the fore-end tip. So I’ve gone through the SAAM ranges using a pack instead of a bipod, and I’ve gone through the same ranges using a bipod and, on many shots, a pack with a bipod. The most obvious disadvantage to an attached bipod is it adds gun weight and yet another projection to snag on brush and make noise, but it’s a very useful tool that provides many options, especially the top-of-line models with telescoping legs for different heights.
One of the challenges I’ve noted with bipods, however, is they can be very difficult to use when shots are angled uphill or downhill, very common situations in mountain hunting. It’s hard to get the height right! Sometimes, on uphill shots, you can put the bipod on a pack to gain needed height. But for shots in steep country I’m pretty well convinced that the pack is a more versatile rest.
The idea is simply to lay the pack down and rest the fore-end across it. Prone over the pack is probably most common, but you can always plunk your pack down on a rock or log, both to gain height and to cushion the rifle. For uphill shots you may need to plump it up a bit, or even add a rolled-up jacket or another pack. You can also turn it sideways instead of laying it flat. Whether daypack or full-on backpack, these days I usually carry a daypack with an internal frame, but if I’m carrying a full-size pack it will also have a frame. This means that, for certain angles, I can set the pack on end and sit or kneel behind it. For downhill shots you may find yourself pushing the rifle farther forward and actually lying somewhat on top of the pack, with your chest resting on it.

There are innumerable ways to use a pack, including setting one atop a boulder or log to gain the right height. There is nothing orthodox about this kneeling position, but getting steady is more important than form.
Then there are the little tricks. A second pack (or rock or rolled-up jacket) can be used to stabilize your shooting elbow, which is very helpful. I think most people probably use the supporting arm to hold the fore-end atop the pack. This works, but I usually go to standard benchrest technique and use my supporting hand under the butt, scrunching it into my shoulder. I freely admit one disastrous miss when the fore-end slipped off a high spot on the pack just as I squeezed the trigger! This wouldn’t have happened if I’d been holding the fore-end, so make sure the darned thing is steady. If you use your supporting hand as I usually do, under the butt, then you can also use it to adjust your height. Depending on angle and plumpness of pack, sometimes you can do this with your hand, but you can also use a glove or a light beanbag. To give proper credit, this last is a trick from SAAM, and since seeing it I’ve used it several times.
The pack can also be used under a leg to augment the kneeling position…or to the side to stabilize the shooting elbow. The thing is, there are lots of ways to use a pack to gain stability. But almost none of them, or anything else, is useful if you’re on a mountainside, the animal is standing there, and you’ve never practiced this stuff or even seen it done. This was brought home to me in spades when we had a doctor friend of ours on a tahr mountain in New Zealand. She is a very good and precise shooter…but this was her first mountain hunt. She had never shot prone over a pack, but this was the best option under the circumstances. She missed and was devastated, shaken to the core. By chance we were spending the next day hunting fallow deer at Ritt Richards’ farm…and he happens to be an experienced shooting instructor with good ranges on his place. We started over with some good instruction, the lights went on, and the next day she marched up the mountain and shot a great bull tahr perfectly, prone over a pack.
There is more than one lesson here. The pack is an extremely valuable shooting aid, but it’s a lot easier if you’ve practiced using it, and this is something that can easily be practiced on most any range. In the larger sense, there are lots of shooting positions and lots of ways to get steady…but none of them are particularly easy if you’ve never tried them before. Out in the field, with a fine animal in front of you and buck fever rearing its ugly head, is not the time to learn new ways to get steady.